This week, we completed our implementation of the parking guideline feature. This feature was intended to complete our suite of parking assist features, adding a manual assistance option onto our parallel and perpendicular autonomous parking modes. Inspired by the parking guidelines found in cars’ rear view camera images, we implemented a computer vision system that displays the Neato’s projected path while the user is navigating manually via teleop twist.
The implementation of our parking guidelines feature can be broken up into the following steps: first, we drew an arc that represented the Neato’s projected path. Next, we warped and transformed the arc in order to fit it into the dimensions of the plane represented in the image. Then, we overlaid this transformed arc over the camera image from the Neato. Finally, using the algorithms we developed during our CV project, we turned the arcs green to indicate that it was properly aligned with the parking spot.
Drawing the Neato’s Projected Path
Our first step was drawing a top-down image of the Neato’s projected path. We did this with OpenCV’s ellipse drawing function. We began by drawing one arc which represented the path that the Neato would travel. Since we wanted to show the projected path of the neato’s “tire tracks” as cars typically do, we duplicated this arc and shifted it a fixed distance left and right of the center point in the x direction to represent the paths of the left and right wheels.
The arc we drew is roughly a quarter of an ellipse. The radius of our arc is equal to velocity/omega. The center of the arc is a function of the radius, as are the axes. We adjusted directionality appropriately based on omega. This is done by manipulating the start and end angles of the arc.
At this point, we’ve drawn an ellipse that corresponds with the Neato’s projected path. When we change the velocity and omega of the Neato using teleop twist, we can see that the path responds appropriately and as expected. One problem remains, though, which is that the path we’ve got at this point is a top-down representation of the Neato’s projected arc.
Warping/Transforming the Arc
In this step, we took the top-down arc we drew in the previous step and warp it to fit the plane of the ground on the Neato’s camera footage. To do so, we made use of OpenCV’s built in getPerspectiveTransform and warpPerspective functions. By making use of these functions, we can transform an arc like the one at left onto a plane like the arc at right.
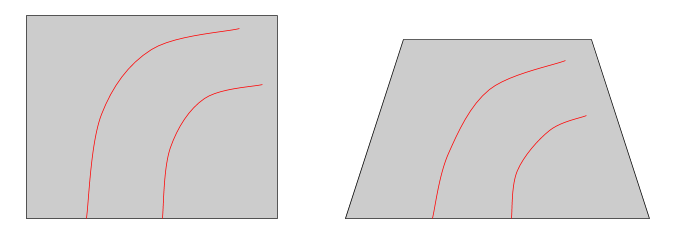
The warpPerspective function required us to specify the coordinate locations to which we wanted to match each of the corners of our unwarped arc image. We chose coordinates which corresponded with the bottom corners of our camera image, and aligned our top corners with the “horizon line,” also known as the line where the ground meets the wall. Note that this implementation detail corresponds with a flaw in our system: as we get closer to the the wall, we do not make any adjustments for changes in the location of the horizon line.
Overlaying the Arc
Our warped arc is drawn on a transparent background. Once we have our warped image, we overlay this image on top of the Neato’s camera footage. We did so by following this tutorial. This process involves performing bitwise operations on the image to create masks, extract any areas with color, and then lay the extracted areas onto the “region of interest” we define on our original camera footage. As stated above, the region of interest is the plane that corresponds with the ground in our camera footage.
Checking for Alignment
In our CV project, we developed an HSV filter for the Neato’s camera footage that filtered out parking spot delineators. This filter resulted in images like the binary image below. As you can see, the white points correspond with the lines that delineate an available parking spot.
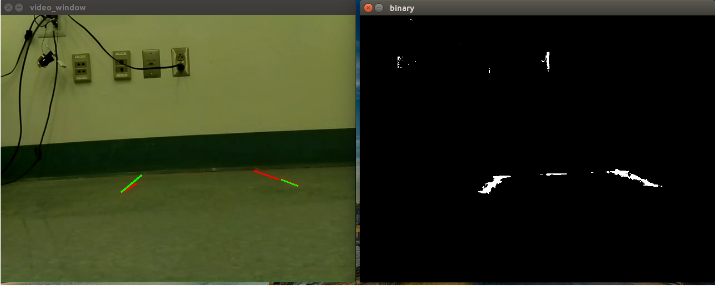
Using this binary image, we applied OpenCV’s Hough Line Transform Algorithm to detect the lines in the image. This allowed us to determine the endpoints of each of our parking spots. The lines which result from this step can be seen in the image above on the left.
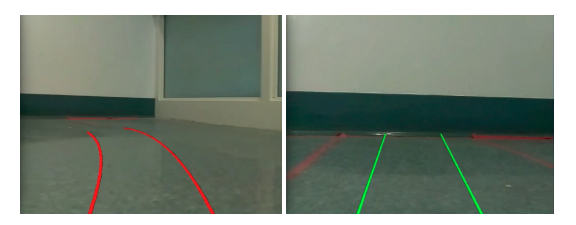
As our final step, we compared the endpoints of our projected path to the endpoints of the parking spot we detected using the steps above. As long as the pixel coordinates of the projected path’s endpoints fell within the pixel coordinates of the actual parking spot’s endpoints, the Neato is aligned. When the Neato is aligned, we change the color of the Neato’s parking guidelines to green to indicate we are ready to move forward into the spot and park. This color transformation upon alignment can be seen in the images below.
Conclusion
If you’d like to see a demo of our parking guidelines in action, take a look at this video. Note that the lines turn green when the Neato detects that it is properly aligned with the spot. At this point, we can simply drive forward into the spot and park successfully.
This concludes our final project. As a summary, we’ve implemented a full suite of parking assist features. We began by implementing two different modes of autonomous parking. Finally, we added a parking guideline system that provides guidance while operators manually navigate the Neato via teleop twist. This suite of features is inspired by the capabilities available in modern cars, and gives drivers the ability to park their “cars” safely and easily.
Again, thank you for reading our blog! We welcome any feedback, and invite you to explore the rest of our website. We especially encourage you to take a look at the demo page for videos of each of our features in action!